 ------------------------
 In the animated photo you can see the front and back side of the circle maze clue. This type of maze was created by James many years ago. As of this writing we have not seen another example of this type of maze. However with billions of people on this planet there is always a possibility that someone else may have created this same type of maze independently. However that remains to be seen.
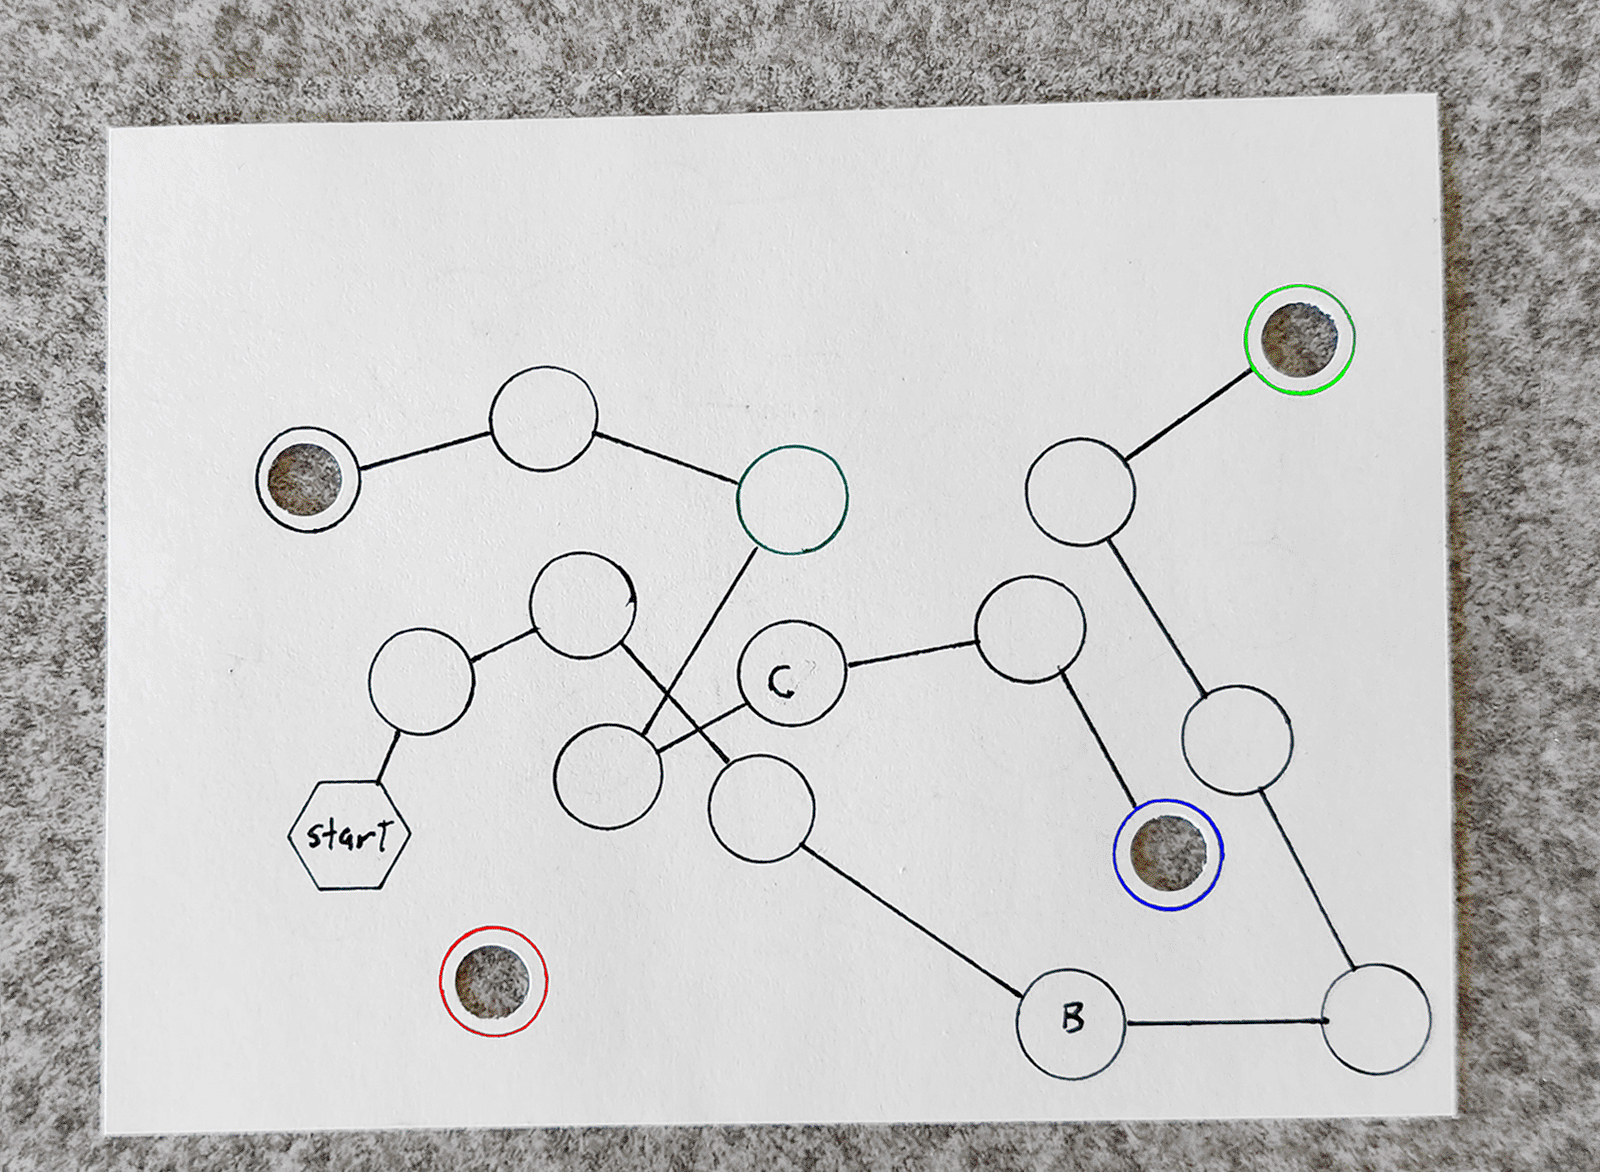
The object of this maze is to begin at the hexagon marked "Start" and then follow the correct path of conected circles to the hexaon marked "Finish". The rule for movement on this type of maze is that to travel from one circle to the next you must use the straight line that connects them. It is forbidden to move to an adjacent circle where there is no straight line that directly connects them [no matter how close the circles may be to each other]. While following the correct path the clue will be revealed one letter at a time.
Using a hole punch and a protractor with a circle guide template we punched out the holes and drew the circles you see here. It was important to draw in the correct path first and write in the real clue along that path. In his case, using the "portal holes", the correct path traversed both sides of the paper twice. Each hole has it's colored circle which makes it easier for you to know where you come out on the other side. We put a one-word clue [bench] on the correct path.
Once the correct path wascomplete we then filled in the rest of the space in with as many "dead-end" paths as we could make! Two of the photos in the rotation show only the correct path. The other two show both sides of the completed maze. Take a few moments to watch the animated photo and follow the correct path to see where it all goes. As you can, see the completed maze can actually be a real challenge!
This is the complex "portal holes" version that allow you to continue the path on the either side of the paper. If you are doing this for younger children you may want to opt for a onesided version of this maze.
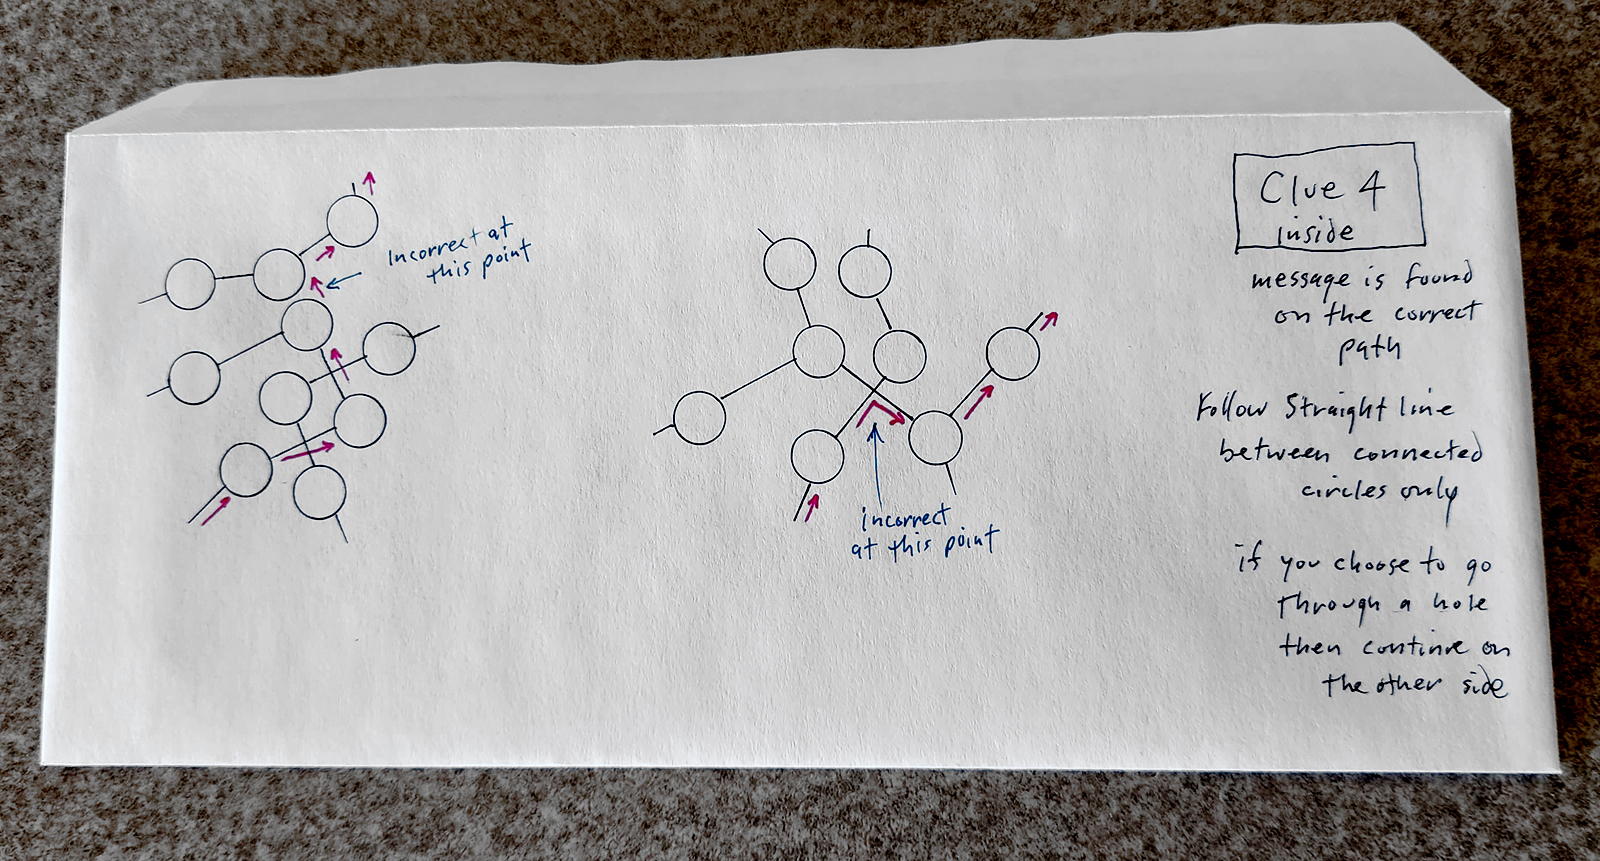 This second photo is the envelope in which he circle maze is kept when put in a hiding spot. It looks mysterious enough in it's own right! It's our experience that most people, when confronted with this type of maze, will not correctly understand the proper way to move through it. So it would be wise to put instructions on the outside of the envelope so the participants know what's correct and incorrect about how to move through the maze. Most of you know this, but briefly, most devices have a way to expand the photo so you can see and read the instructions on the envelope better. On a PC you should be able to "right click" to see the expanded view [or view in a separate tab]. On a cell phone you put two fingers on the screen and spread them apart. The circle maze samples on the envelope explicitly show what not to do.
If you like this idea then be sure to bookmark this page so you can find this again.
Share this with your friends
 This clue with color changing letters was created by James many years ago. As of this writing we have not seen another example of this particular idea being used in a treasure hunt. However with billions of people on this planet there is always a possibility that someone else may have done this before. However that remains to be seen.
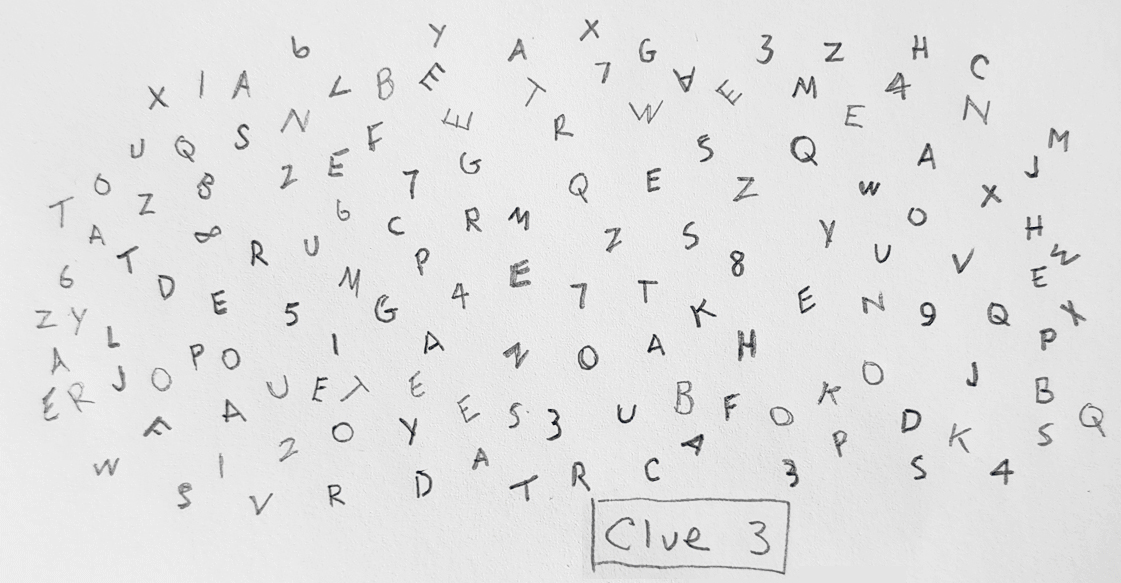
The random looking mixed letters that you see here in the animated photo [with the words "Clue 3"] were written on the face of an envelope. The participant would initially see, as shown in one of the frames of the animated photo, that all the lettering was written in gray pencil. However upon running water over the envelope, as you will note in the other frame of the animated photo, that part of the lettering had turned purple. This, of course, revealed the clue which reads "inbetween route books".
So here's the scenario: The participant encounters the envelope and notes that all the lettering is written in gray pencil. It will be immediately apparent that unscrambling those letters into a "clue" would be a daunting task without additional help. Well, inside the envelope the participant will find a piece of paper that had been cut into a "jigsaw" puzzle. When the puzzle is pieced together the words "Wet the envelope" will be revealed. Click HERE to see that. Oe other thing: The envelope you use needs to be pure white both inside and out. If you have security coloration of any kind o the inside of the envelope it will severely interfere with the writing you see on the outside of the envelope once it's wet.
To do this you're going to need a good indelible pencil and an electric pencil sharpener. Not all indelible pencils are equal. Sometimes called "copying pencils" or "chemical pencils" indelible pencils are designed to write permanent markings on moist surfaces. None were ever designed for any recreational purpose such as a treasure hunt.
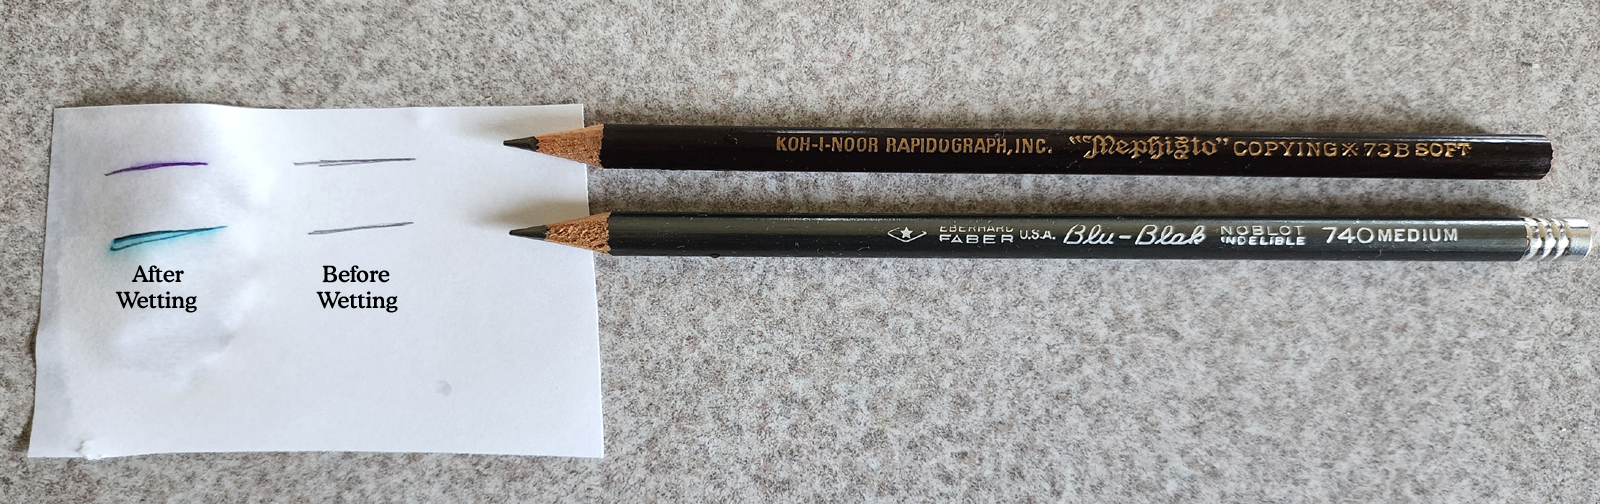
What you need here is an indelible pencil that writes in the color gray that's nearly indistinguishable from that of a regular pencil. On top of that when you get the writing wet it changes into another color. See the photo with the two examples of before and after colors [You may want to take note of the brands and number of each one].
We went on Amazon to check what on what indelible pencils are currently available on the market. As of this writing, all of the indelible pencils had different colored leading except one brand. It did have the gray leading so we bought a pack to give it a test. See the the results here. However when we wet the marks from that one there was no appreciable color change.
Though this means that the "good" indelible pencils are harder to find it doesn't mean that they can't be obtained. It's our experience that a much larger percent of older indelible pencils [made in the 1980's or earlier] will work as needed for a treasure hunt. You can still find he good indelible pencils on Ebay. Here's what you need to do since many of the sellers really don't know much about the stuff they find and sell and most of he indelible pencils are sold as unused [so they are not going to be willing to sharpen one to test it]:
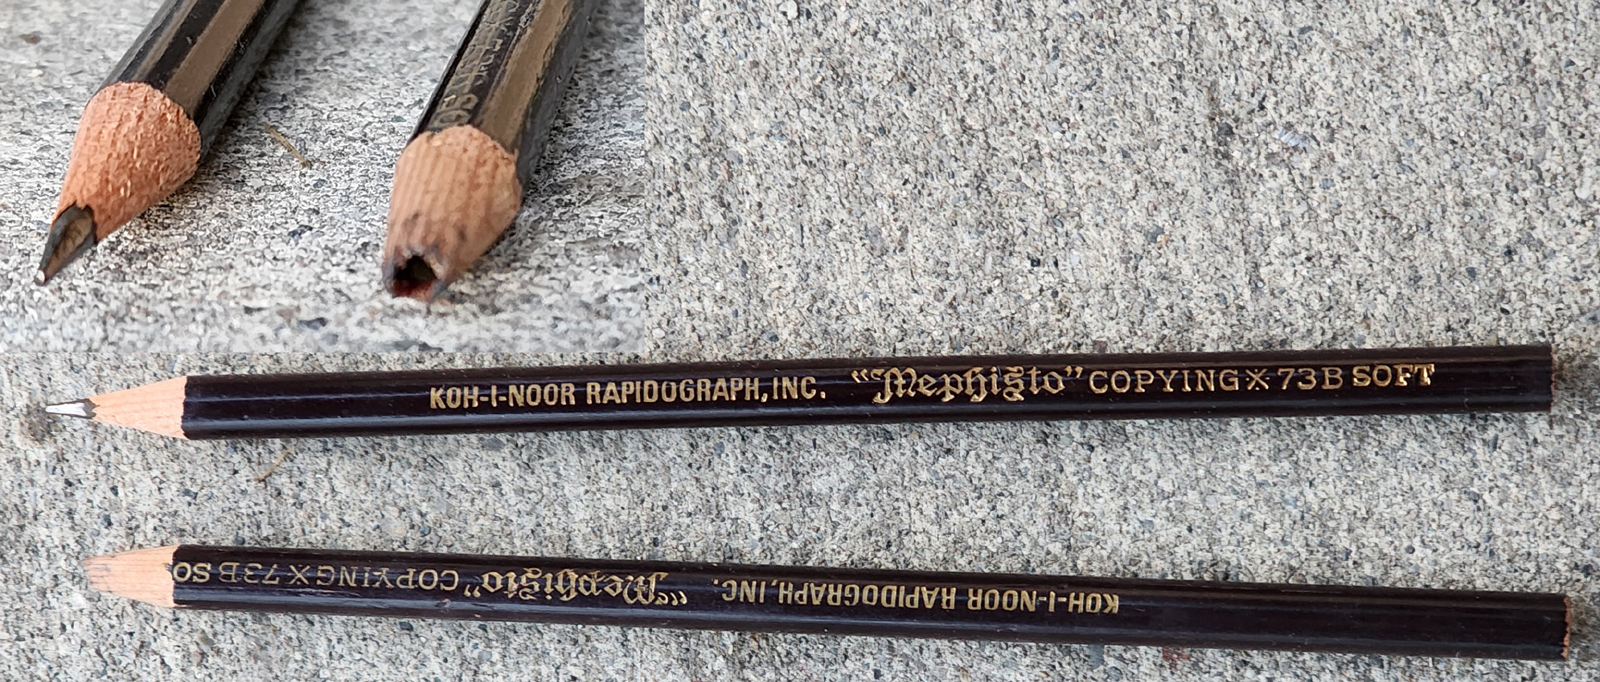
From our experience we find that the leading on all indelible pencils are fragile so you should not attempt to sharpen them with those cheap "dollar store type" sharpeners. See the second pencil photo for the type if issue that is likely to occur. Those cheap sharpeners put high rotational stress on the pencil lead which can cause the lead to break off. A good electric pencil sharpener reduces the odds of breaking the pencil lead. Still when using your electric pencil sharpener your should insert the pencil with minimal pressure while pulling it out frequently to check the progress. Don't go for the sharpest point possible. The points you see in the photos are decent enough.
Secondly, and most importantly, you need to know that indelible pencils contain aniline dyes which are toxic. So it's important to recognize and respect this when using these. You should never put the pencil point in your mouth. If you accidentally puncture yourself with the pencil point you should get immediate medical attention since this will cause severe medical issues. By all means keep indelible pencils away from children.
If you like this idea then be sure to bookmark this page so you can find this again.
Share this with your friends

If you like this idea then be sure to bookmark this page so you can find this again.
Share this with your friends
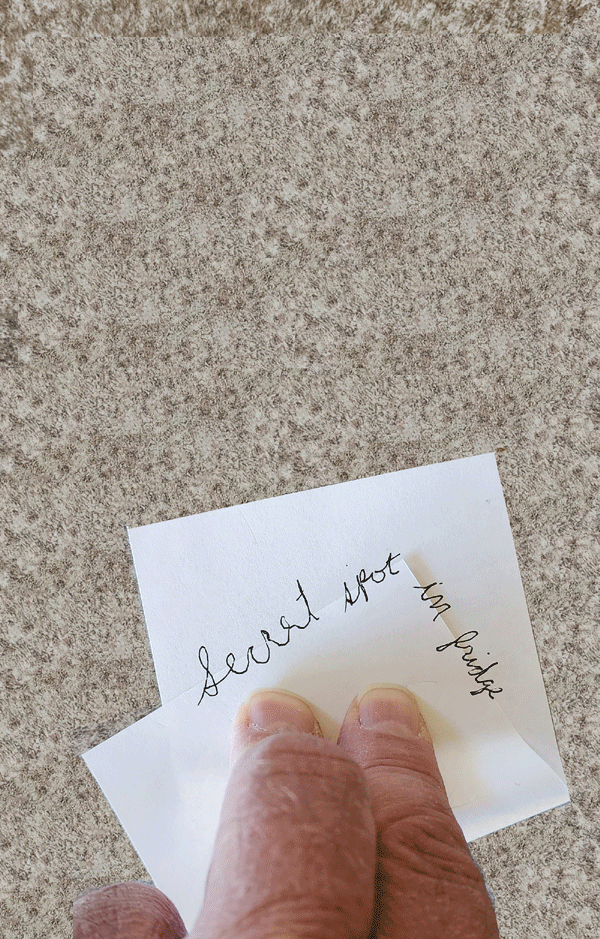
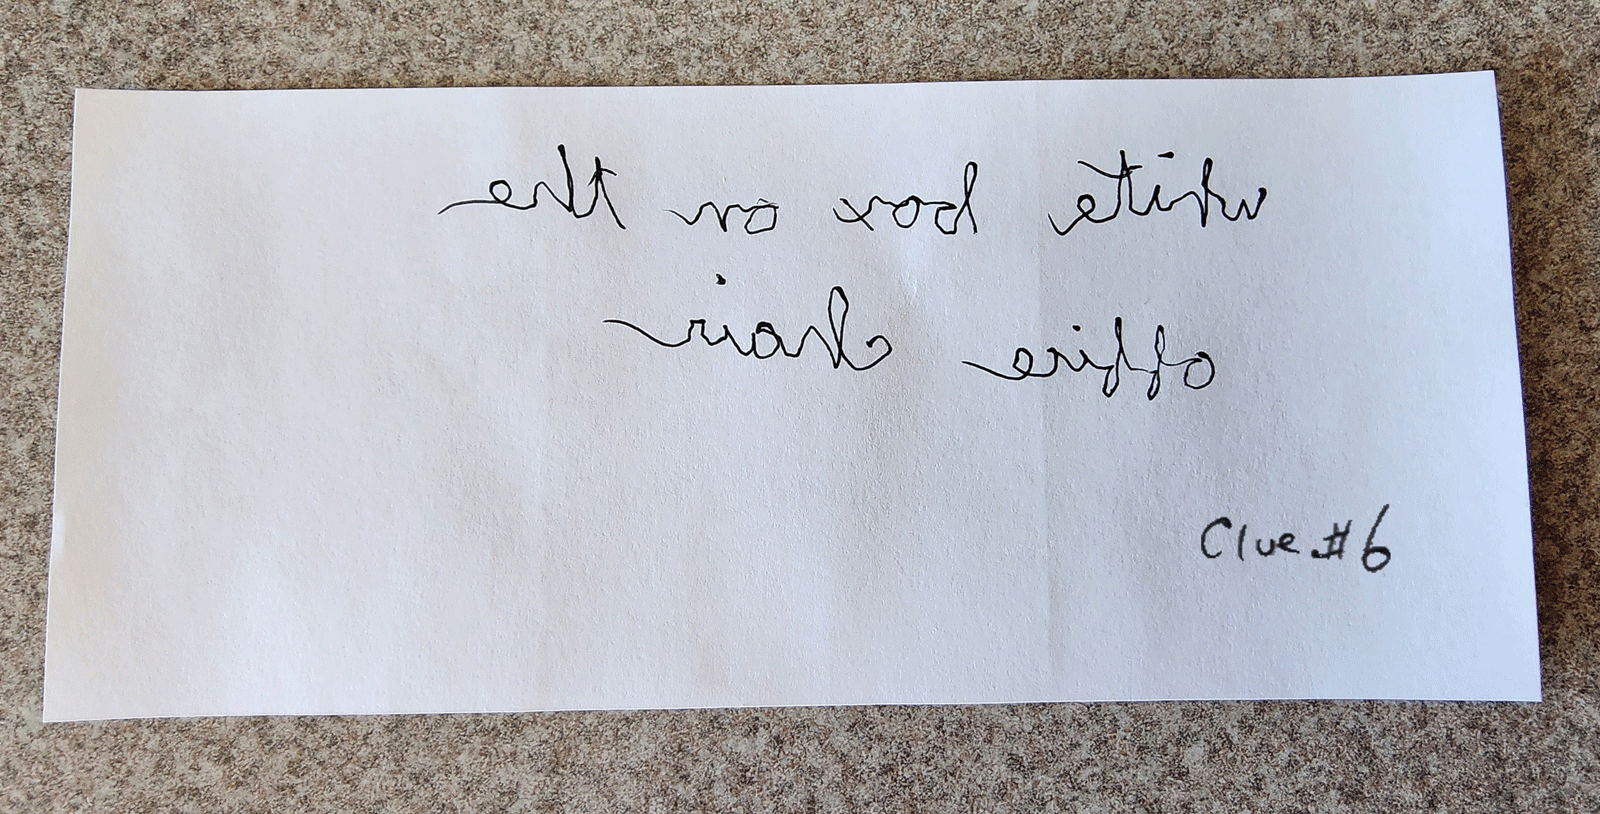
This clue is prepared by folding a piece of paper over onto itself and then writing the clue message across the edge of the paper so that the hand writing is split horizontally through the middle of the message. Take a look at the animated photo. The message is "Secret Spot in Fridge" when the edge is matched up properly.
Here's the scenario: The participant finds this clue which is just a small piece of paper with part of the writing in the middle on one side of the paper. Then on the other side the remainderr of the writing is along the edge at the top/side of the paper. Neither side is intelligable at all.
If you like this idea then be sure to bookmark this page so you can find this again.
Share this with your friends
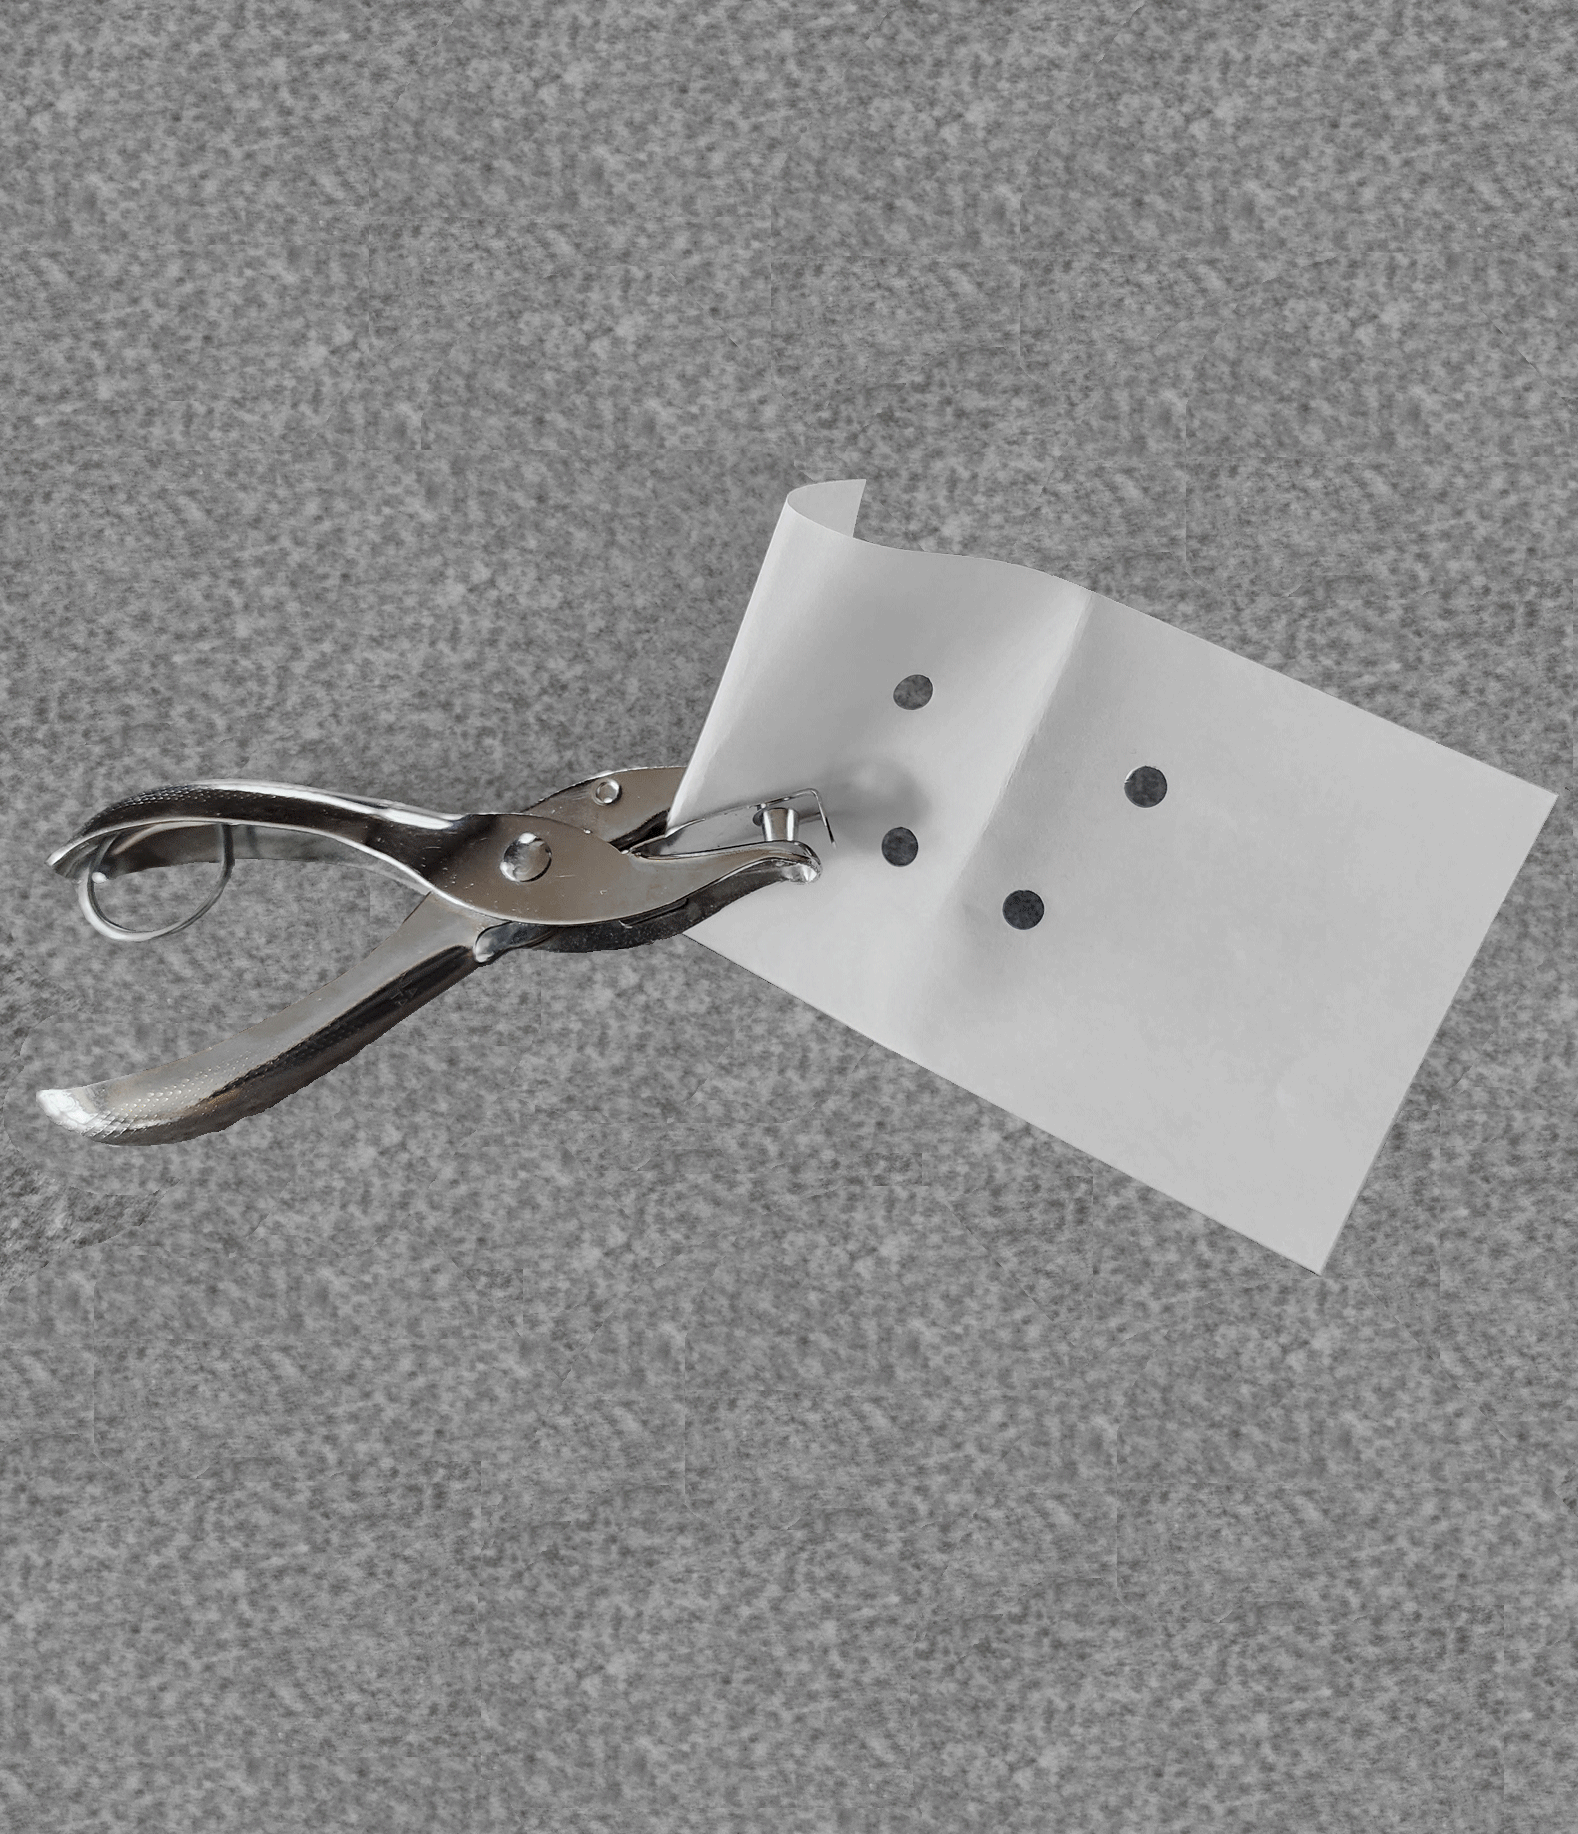
Place the template key on another larger piece of paper and mark out a rough outline of each corner of the templet key. Then spell out the clue letter by letter one through one hole at a time [see the second frame in the animated photo - note the clue here is "swivel chair"]. Once that's done go ahead fill in the area surrounding the clue with random "decoy" letters. You might choose to hide this clue in a cluttered drawer that no one bothers to look in very often!
If you like this idea then be sure to bookmark this page so you can find this again.
Share this with your friends
If you like this idea then be sure to bookmark this page so you can find this again.
Share this with your friends